Wednesday, November 30, 2011

Android 4.0 emulator system and kernel build

好模擬,不編嗎?

    前一陣子在熊貓板上Android 4.0完成後,還是覺得程式在開發階段時還是在模擬器上執行比較有效率,所以又把程式改在模擬器上執行,因此我寫這篇文章來紀錄如何編譯與替換模擬器的系統和核心映像檔

有鑑於網路上較少統合性的文章在討論編譯模擬器的映像檔,就特別寫了這篇文章啦~

1. 環境設置

1.1 下載Android SDK (其實可以用make sdk來自行製作,但是既然有現成的就直接用吧)

http://developer.android.com/sdk/index.html

記得下載r15以後的版本,這樣才有支援4.0喔


1.2 下載平台檔案與建立虛擬裝置

r15以後的SDK貼心的把把版本控制與虛擬裝置分開來,在SDK的根目錄下有兩個可執行檔: SDK Manager 與 AVD Manger,這邊就簡略的用兩張圖帶過囉:

SDK Manager: 請下載 API 14


AVD Manager: 創建4.0的虛擬裝置,螢幕建議設置為HVGA,也就是手機用的螢幕大小,否則開機要好久阿~
 

1.3 執行模擬器,記得指定你建立虛擬裝置時所設定的名稱

$ cd $SDK/tools/
$ ./emulator -avd $YOUR_AVD

以上都還沒進入正題,接下來我們終於可以開始編譯與燒錄自己的程式囉...


2. Android system image編譯與燒錄

2.1 下載Android 4.0原始碼: 老樣子,就去官網抓吧,下載來的源碼存放於android_ICS資料夾中

http://source.android.com/source/index.html

2.2編譯Android 4.0的映像檔

$ cd android_ICS
$ . build/envsetup.sh
$ lunch full-eng
$ make -j4

編譯完成後,模擬器所需要的映像檔會存放在out/target/product/generic/system.img

2.3 用新映像檔開機

$ cd $SDK/tools/
$ export IMAGE_PATH=~/android_ICS/out/target/product/generic/
$ ./emulator -system $IMAGE_PATH/system.img -avd $YOUR_AVD

OK!第一部分大功告成,我們已經成功使用自己的system.img來開機了


3. Linux kernel編譯與燒錄

大家都知道Android基底為linux核心,且採用2.6.29的版本,不過之前在Pandaboard上燒錄時,是採用最新的kernel 3.0,但是模擬器依然使用舊的核心版本

3.1 kernel source 下載

由於Android git不在釋出網頁版本,因此我也是找了許久才知道模擬器的核心被移出common的群組中了,所以我們另外去下載模擬器專用核心(goldfish)

$ cd kernel_ICS
$ git clone git://android.git.kernel.org/kernel/goldfish.git
$ git checkout -b android-goldfish-2.6.29 origin/android-goldfish-2.6.29

3.2 kernel 編譯

如同Pandaboard一般,先設定交叉編譯的環境,以及設定goldfish default kernel config即可,然而天與願違,根據我的實測,透過goldfish_defconfig編譯出來的映像檔,根本無法在模擬器上開機

因此我們必須從模擬器的中 dump出有效的kernel config,其關鍵在於/proc/config.gz

$ cd $SDK/platform-tools/
$ ./adb pull /proc/config.gz
$ gunzip config.gz
$ cp config .config

利用這裡產生的.config來進行 goldfish kernel的編譯

$ cp .config ~/kernel_ICS/goldfish/
$ export CROSS_COMPILE=~/android_ICS/prebuilt/linux-x86/toolchain/arm-eabi-4.4.0/bin/arm-eabi-
$ make ARCH=arm -j4

編譯完成後,用來boot的映像檔就在arch/arm/boot/zImage啦~

(p.s. 若是你打算在模擬器上開發kernel module,請記得打開menuconfig把下列設定啟動再進行編譯喔,預設是關閉的)


3.3 用新核心開機

$ cd $SDK/tools/
$ export KERNEL_IMAGE=~/a=kernel_ICS/goldfish/arch/arm/boot/
$ ./emulator -kernel $KERNEL_IMAGE/zImage -avd $YOUR_AVD

大功告成!! 我們已經成功的用自己編譯的zImage來替換掉emulator所預設的image囉,附上一張示意圖:

Friday, November 18, 2011

Android Ice Cream Sandwich kernel 3.0 on Pandaboard

好核心,不胖達嗎?

繼上一篇討論如何燒錄Android framework到Pandaboard後,這篇來教學如何燒錄Android kernel for OMAP-4430,再進行這裡的步驟之前,請先照著上一篇做一次,把必要的工具和環境建立出來

1. 下載Android kernel source for Pandaboard

由於Android的kernel source repository掛掉很久了,要檢視所有的branch變得非常困難,首先我們要用git下載Android kernel for OMAP,Pandaboard採用的核心版本為最新的krenel 3.0

$ mkdir kernel_ICS
$ cd kernel_ICS
$ git clone https://android.googlesource.com/kernel/omap.git
$ cd omap
$ git branch -r
$ git checkout -b android-omap-panda-3.0 origin/android-omap-panda-3.0

由於Panda是採用OMAP4430的CPU,當然要抓這個分支囉


2. 編譯kernel

$ export PATH=android_ICS/prebuilt/linux-x86/toolchain/arm-eabi-4.4.0/bin:$PATH
$ export CROSS_COMPILE=arm-eabi-
$ cd kernel_ICS/omap/
$ make ARCH=arm panda_defconfig
$ make ARCH=arm -j4

要編譯kernel當然要先設定cross compiler, 從4.0原始碼裡面有提供編譯好的cross compiler binary,直接用他的就好


kernel config這邊選擇panda_defconfig,(我當初下載的是common kernel source,找半天沒有適合Panda的config)

到目前就算是初步完成囉,編譯好的kernel image會放在arch/arm/boot/zImage


3. 重建boot.img

網路上有很多人寫了方便的script,主要功能就是把原本要燒到SD卡上的boot.img拆開後,再把裡面原本的kernel image掉包成我們剛剛編譯好的zImage,這方法是比較有效率的,但是我太懶所以就請Android本身的makefile幫我們做這件事情囉

$ cd android_ICS/device/ti/panda/
$ mv kernel kernel.bak
$ cp kernel_ICS/omap/arch/arm/boot/zImage ./kernel
$ make -j4

簡單來說,Panda的kernel原本是以預先編譯好的方式存放在device資料夾裡面,我們做的事情就是單純的把他的image掉包成我們編譯的image(記得備份舊的)

重新編譯以後,會把新的kernel重新包入boot.img裡面,就算大功告成了

4. 燒錄kernel

燒錄時可以完全參考前一篇的作法,但是因為連整個system都重燒,會導致第一次開機非常久,

因此建議採用以下步驟來燒錄kernel

4.1 SD卡,USB線,UART線,HDMI線,電源線全部都接好,按住GPIO按鈕再按reset按鈕,直到u-boot進入fastboot模式

4.2 由於SD卡已經format好,而且我們只需要重燒boot.img的部分

$ sudo su
$ cd android_ICS/out/host/linux/bin
$ ./fastboot flash boot
$ ./fastboot reboot

如此一來重開機速度就會非常快了,附上一張修改kernel後顯示的kernel version

Android 4.0 Ice Cream Sandwich on Pandaboard

好胖達,不燒嗎?

這份教學文件的目的是編譯Android 4.0並且燒錄至Pandaboard上,請依照步驟執行

0. 環境設定

我所編譯的環境是Ubuntu-10.10-server , x64

Intel Core-i7 四核心, 16 GB RAM

建議Android的開發盡量在64位元作業系統上執行會比較順利

1. 下載Android 4.0原始碼

http://source.android.com/source/downloading.html

值得強調的一點: 請勿下載android-4.0.1_r1分支,因為這版本的Pandaboard kernel有問題,會無法成功開機,所以我們就下載最新的master版本

$ mkdir android_ICS
$ cd android_ICS
$ repo init -u https://android.googlesource.com/platform/manifest
$ repo sync

2. 編譯原始碼 for Pandaboard

在編譯之前我們要設定 for Pandaboard 的環境變數,Android幫我們寫好一個簡單的工具可以快速的設定所有的環境變數

$ cd android_ICS
$ . build/envsetup.sh
$ lunch full_panda-eng

下載Android for Pandaboard的driver patch

http://code.google.com/intl/zh-CN/android/nexus/drivers.html

解壓縮後會產生一個extract-imgtec-panda.sh, 放置到android的根目錄

執行這個script檔,並且同意他的聲明後,就會自動完成patch

Type "I ACCEPT" if you agree to the terms of the license: I ACCEPT


接下來就是快樂的編譯時光,除了編譯開機映像檔以外,我們也要編譯fastboot工具,等等就會用到了, j後面的數字代表要開幾條thread來編譯,基本上核心多的電腦可以用4條thread

$ make fastboot
$ make -j4

接下來就等待編譯完成吧,估計會花上半小時至數小時不等(視電腦運算速度而定)

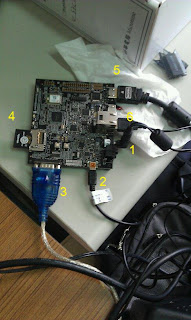
3.Pandaboard硬體配置


(1) 電源線(5v)

(2) mini USB to USB線,以下簡稱USB線

(3) UART線

(4) 4GB的SD卡(文件上寫需要4GB,但實際上不確定能不能用更小的空間完成)

(5) HDMI to DVI線,以下簡稱HDMI線

(6) USB滑鼠與USB鍵盤,網路線 (option)


齊備了這些線材配置之後,我們要來燒錄Pandaboard了!!

4. 燒錄流程

整個燒錄過程需要有root權限,所以我們root過後重新設定一下環境變數

$ sudo su
$ cd android_ICS
$ . build/envsetup.sh
$ lunch full_panda-eng

4.1 首先接上UART線,這是我們用來確認板子上到底發生什麼事情的好手段,方便找出錯誤之用(換句話說,如果你有信心,這步驟跳過亦可)

我是在筆電上進行監測,所以我們這裡用putty軟體,若是在工作站環境,建議用minicom, serial port設定為ttyUSB0, 若是用一般的RS232線, 就要用ttyS. Baudrate要設定為115200


接下來理論上就可以從putty中看到開機時噴出的訊息了(現在應該是還沒有訊息的)

4.2 確認SD卡被拔除, 插上USB線,再插上電源線,從server主機以root身分下指令:

$ cd android_ICS/device/ti/panda
$ ./usbboot ./bootloader.bin

此時主機會將bootloader的執行檔直接塞到板子的RAM上面,並用此bootloader進入工廠模式(也就是fastboot模式),若是有用UART來debug, 現在應該看的到進入fastboot mode

接下來插入SD卡(卡片不需要做任何format或設定,因為等等會自動重新format)

$ cd android_ICS/out/host/linux/bin
$ ./fastboot oem format
$ ./fastboot flash xloader android_ICS/device/ti/panda/xloader.bin
$ ./fastboot flash bootloader android_ICS/device/ti/panda/bootloader.bin

上述動作也必須在root下完成,主要是在把插在Pandaboard上的SD卡format好以後,把u-boot寫入到此SD卡之中,當未來重新啟動電源時,板子就會自動去讀此SD卡上的bootloader,就不需要每次都從主機上傳bootloader過去了

(PS: 這邊的format步驟只需要做一次即可,因為理論上我們未來不需要去修改SD卡上的bootloader,所以如果之前做過這步驟,就直接跳過4.2和4.3吧)

若是上述指令出現問題,可以用以下指令來驗證主機是否能夠偵測到處於工廠模式下的板子,若是偵測不到裝置,代表可能是你的板子不處於fastboot mode之下,請用putty做確認

$ ./fastboot devices

4.3 接下來要用SD卡的bootloader進入工廠模式(若是你依照上述步驟走下來,現在已經進入工廠模式)

若是中途曾經重開機過,要進入SD卡的bootloader之工廠模式的話,請按住板子上的GPIO按鈕,然後按下旁邊的RESET按鈕,直到putty上出現你進入工廠模式即可

$ cd android_ICS/out/host/linux/bin
$ ./fastboot erase cache
$ ./fastboot flash userdata
$ ./fastboot flashall

上述動作主要是透過工廠模式,把系統的映像檔燒錄到SD卡上,未來開啟電源時,板子會先從SD卡上載入bootloader,然後bootloader又會從SD卡上載入這個映像檔,並掛載成為root file system

這幾個動作總共要花十分鐘左右,可以透過putty來觀察是否有成功

5. 開機

如果你是依照上述步驟走下來的話,此時會自動開始boot, 第一次開機大約要花上15分鐘

請記得接上USB滑鼠,HDMI線和網路線,就可以開始玩Android 4.0囉!!

(PS: 要特別注意,在螢幕解鎖畫面下,系統很快會進入idle模式,此時只要動一動你的滑鼠,螢幕就會跑出來囉)

(PS: 第一次開機似乎顯示driver剛初始化無法正確運作,請等到他完成初始化後,再重新開機就可以正確進入)


6.後續設定

$ cd android_ICS/out/host/linux/bin
$ ./adb shell

# dhcp

若是要進入adb shell做事,也必須擁有root權限,進去後可以透過netcfg或dhcp來設定網路~

關於如何編譯與燒錄Pandaboard的kernel, 請參考另一篇文章

Saturday, October 8, 2011

Build Android SDK for windows in Ubuntu

$ sudo apt-get install mingw32
$ make -j4 PRODUCT-sdk-win_sdk showcommands dist

If you want to use ddms.bat,

the PAH environment variable should be added "adb.exe"

Friday, June 17, 2011

Translation among bitmap, drawable, resource and view

Android offers many kinds of representation of image,

it is troublesome to translate among them.

Bitmap is a very convenient representation of an image,

here are some rules between bitmap and other representations:

1. Bitmap from resource

  1. Bitmap bitmap = BitmapFactory.decodeResource(this.getResources(),
  2.                 R.drawable.resource);


2. Bitmap from/to a image file in the sd card

  1. BitmapFactory.Options option = new BitmapFactory.Options();
  2. option.inSampleSize = 2;
  3. Bitmap bitmap = BitmapFactory.decodeFile("sdcard/image.jpg", option);

option.inSampleSize = 2 implies the resolution of image file is divided by 2

  1. File file = new File("/sdcard/", "image.jpg");
  2. if (bitmap.compress(Bitmap.CompressFormat.JPEG, 80, fos)){
  3.    fos.flush();
  4.    fos.close();
  5. }

This translation requires the permission :<uses-permission android:name="android.permission.WRITE_EXTERNAL_STORAGE"/>

3. Bitmap from View or the View-liked components

  1. myView.setDrawingCacheEnabled(true);
  2. myView.destroyDrawingCache();
  3. Bitmap bitmap = myView.getDrawingCache();

We can fetch the content of a view (include ImageView, WebView ...) by enable the drawing cache of it. Once the getDrawingCache is called, the bitmap will be generated according to the previous canvas the view contains. If we want to fetch the latest content, it is necessary to destroy the drawing cache first (If the drawing cache is null, getDrawingCache() will generate the current status).

4. Bitmap from/to drawable

  1. BitmapDrawable bitmapDrawable = (BitmapDrawable)drawable;
  2. Bitmap bitmap = bitmapDrawable.getBitmap();

  1. Drawable drawable = new BitmapDrawable(bitmap);

The above code is not verified, maybe you can try it.

5. Bitmap from/to canvas

  1. Bitmap bitmap = Bitmap.createBitmap(canvas.getWidth(),
  2.         canvas.getHeight(), Bitmap.Config.ARGB_4444);
  3. Canvas canvas=new Canvas(bitmap);

The above code let us "draw" some figures to the bitmap instead of "get" the figures which are draw at the canvas. If you want to achieve the latter functionality, just try the rule 3.

  1. canvas.drawBitmap(bitmap, left, top, paint);

The canvas.drawBitmap can display any bitmap to a certain location of your canvas.